This post explains how to collect detailed lists of your Active Directory service accounts so you can implement proper governance to reduce your attack surface area.
Specifically, it details how to enumerate service accounts used by the following:
- Windows Services
- Scheduled tasks
- IIS application pools
This will enable you to identify a significant portion of your service accounts. However, note that service accounts can also be used in virtual directories, authentication settings, etc. This blog post does not cover how to enumerate those service accounts.
Windows Services
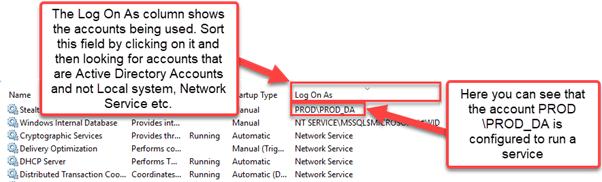
The most obvious place to find service accounts that are being used is Windows Services (Services.msc). Simply click the Start menu, type “services” in the search box, and click Services. You will see a list of services and the accounts being used to run them:
Alternatively, you can use PowerShell and WMI to retrieve this information and store it in a CSV file for later processing. Here are three scripts you can choose from:
# WMI Query to Retrieve All Services, Get the Accounts Used to Log on to Them, and Export Them to a CSV File on the Local Computer

$CSV_File_Path  = "" #Path to excel file to export information to

$Services = Get-WmiObject Win32_Service

$Services_Info = $Services | Select-Object Name, Caption, StartName, StartMode

$Services_Info | Export-Csv $CSV_File_Path

# WMI Query to a Remote Computer to Retrieve Service Information

$CSV_File_Path = "" #Path to excel file to export information to

$Computer_Name = "" #Name or IP Address of the computer to query

$Services = Get-WmiObject Win32_Service -ComputerName $Computer_Name

$Services_Info = $Services | Select-Object PSComputerName, Name, Caption, StartName, StartMode

$Services_Info | Export-Csv $CSV_File_Path

# Query Multiple Computers using a CSV List

$CSV_Input_File = "" # Path to CSV File where A1 is a header called ComputerName and A2 and below are Computer Names

$CSV_File_Path = "" #Path to excel file to export information to

$Computer_Names_Import = Import-Csv $CSV_Input_File

foreach ($Computer_Name in $Computer_Names_Import)

{

      $Computer_Name = $Computer_Name.ComputerName

      $Services = Get-WmiObject Win32_Service -ComputerName $Computer_Name

      $Services_Info = $Services | Select-Object PSComputerName, Name, Caption, StartName, StartMode

      $Services_Info | Export-Csv $CSV_File_Path -Append

}
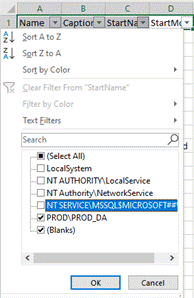
You can then open the file in Excel and use filters to hone in on the key details shown below:

Be sure the run the scripts across all of your servers.
Scheduled Tasks
Service accounts are often used to run scheduled tasks; that way, admins can grant the account only the permissions required for the task.
If you use the GUI to locate these service accounts, you will need to check each scheduled task for the account that is used to run it:
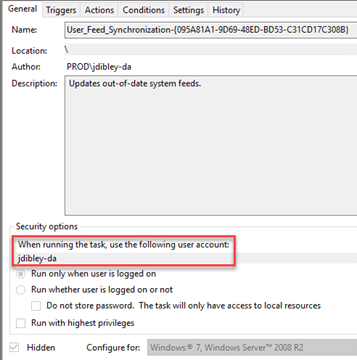
More recent versions of Windows create tasks for all users who log in, which means that tasks like the one above (User_Feed_Synchronization) can be safely ignored. However, all other tasks should be checked for service accounts.
There are two automated ways to collect the service accounts used by scheduled tasks:
- Using the ScheduledTasks PowerShell module. However, I don’t believe this option can be used to query older systems.
- Using the files in C:WindowsSystem32Tasks
Using the ScheduledTasks Cmdlets
Using the ScheduledTasks cmdlets is the simpler option if they work across all of the servers you need to query. Below is a PowerShell snippet for creating a CSV file that lists tasks with the associated username and logon type:
# Getting Scheduled Tasks using Get-ScheduledTask

$CSV_File_Path = "" #Path to excel file to export information to

$All_Scheduled_Tasks = Get-ScheduledTask #This will also include the default microsoft ones

$Scheduled_Tasks_ExMicrosoft = $All_Scheduled_Tasks | Where-Object { $_.TaskPath -notlike "Microsoft*" } # Exclude the Microsoft Tasks

$Scheduled_Tasks_Info = $Scheduled_Tasks_ExMicrosoft | Select-Object TaskPath, TaskName, @{ Name = "Username"; Expression = { $_.Principal.UserID } }, @{ Name = "LogonType";  Expression = { $_.Principal.LogonType } }

$Scheduled_Tasks_Info | Export-Csv $CSV_File_Path
Using the Task XML Data
Using the task files to get the data seems to work well across all operating systems, but it is a bit more tedious:
# Getting Scheduled Tasks using XML Files in C:WindowsSystem32Tasks

$CSV_File_Path = "" #Path to excel file to export information to

$Task_Folder_Location = "C:WindowsSystem32Tasks" # Path to the Scheduled Tasks folder

$Task_XML_Files_All = Get-ChildItem $Task_XML_Files -Recurse

$Task_XML_Files_Filtered = $Task_XML_Files_All | Where-Object { $_.FullName -notlike "$Task_Folder_LocationMicrosoft*" }

foreach ($Task_XML_File in $Task_XML_Files_Filtered)

{

      $Task_XML_File_Path = $Task_XML_File.FullName

      #Getting the Principal and Logon Type

      [XML]$XML_Content = Get-Content $Task_XML_File_Path

      $Task_Principal = $XML_Content.Task.Principals.Principal.UserID

      $Task_LogonType = $XML_Content.Task.Principals.Principal.LogonType

      $Output = $Task_XML_File | Select-Object Name, FullName, @{ Name = "Task_Principal"; Expression = { $Task_Principal } }, @{ Name = "Task_LogonType"; Expression = { $Task_LogonType } }

      $Output | Export-Csv $CSV_File_Path -Append

}
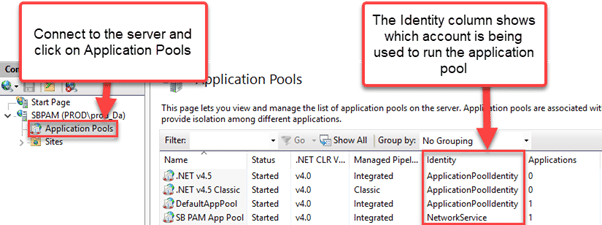
IIS Application Pools
IIS application pools are still very common, especially for running internal websites. Organizations can use service accounts to enforce least-privilege access for each application pool.
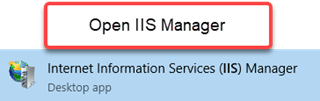
To find the service accounts being used to run application pools using the GUI, follow the instructions below:
Finding this information using PowerShell is a bit tricker. First, you need to ensure that the server you want to interrogate has the IIS Management Scripts and Tools feature installed. Use the following snippet of PowerShell:
# Check whether the IIS Management Scripts and Tools feature is installed. If not, then install it.

$Feature_Name = "Web-Scripting-Tools"

$Feature = Get-WindowsFeature -Name $Feature_Name

If (-not ($Feature.Installed))

{

      Install-WindowsFeature -Name $Feature_Name

}
Now you can use the WebAdministration module to get the service account information for IIS application pools on one or more machines:
# Get Application Pools using WebAdministration Module on a Single Machine
$CSV_File_Path = "" #Path to excel file to export information to
$Application_Pools = Get-ChildItem "IIS:AppPools"
$Application_Pools_WithUsername = $Application_Pools | Select-Object Name, State, @{ Name = "Username"; Expression = { $_.ProcessModel.Username } }
$Application_Pools_WithUsername | Export-Csv $CSV_File_Path

# Get Application Pools Using WebAdministration on Multiple Machines
$CSV_Input_File = "" # Path to CSV file with A1 set to ComputerName and then A2 and below being the actual computer names
$CSV_File_Path = "" # Path to excel file to export information to
$Output_Folder = "" # Path to a folder to import all the export files to
$CSV_Computers = Import-Csv $CSV_Input_File
$Computers = $CSV_Computers.ComputerName
Invoke-Command -ComputerName $Computers -ArgumentList $CSV_File_Path -ScriptBlock {
	param($CSV_File_Path)
	$Application_Pools = Get-ChildItem "IIS:AppPools"
	$Application_Pools_WithUsername = $Application_Pools | Select-Object Name, State, @{ Name = "Username"; Expression = { $_.ProcessModel.Username } }
	$Application_Pools_WithUsername | Export-Csv $CSV_File_Path
}

# Collecting the output files by using Admin shares and modifying the $CSV_File_Path parameter to get the location on target machine
foreach ($Computer in $Computers)
{
	$UNC_File_Path = "\$Computer$($CSV_File_Path -replace ':', '$')"
	Move-Item -Path $UNC_File_Path -Destination "$Output_Folder$Computer.csv"
}

# Merging the files into a single CSV file called Merge.csv
$All_CSV_To_Merge = Get-ChildItem -Path $Output_Folder
foreach ($CSV in $All_CSV_To_Merge)
{
	$CSV_Import = Import-Csv $CSV.FullName
	$CSV_Import_Update = $CSV_Import | Select-Object Name, State, Username, @{ Name = "ComputerName"; Expression = { $CSV.Name } }
	$CSV_Import_Update | Export-Csv "$Output_FolderMerge.csv" -Append
}
Using the Collected Lists of Service Accounts
Now we have CSV files listing the service accounts used by:
- Windows Services
- Scheduled tasks
- IIS application pools
Each of these files will have a ComputerName or PSComputerName field, which can be used to get a better view of what is configured on the server. Each one will also have a username field, which can be used to determine how many servers a particular account can be used on.
To streamline the analysis, you can use Excel VLOOKUP formulas to organize the data. Alternatively, you could ingest the CSV files into a database, set up relationships between the fields, and use queries to get the information you need.
How can Netwrix help?
Even with PowerShell, collecting and collating data on service accounts can be quite cumbersome. Netwrix StealthAUDIT provides easy-to-use reports on service accounts, as well as the raw data if you want it.
In addition, Netwrix StealthAUDIT will enable you to:
- Identify vulnerabilities that can be used by attackers to compromise Windows systems and get to your data.
- Remediate security gaps by quickly and efficiently assessing system patch levels.
- Enforce security and operational policies through baseline configuration analysis.
- Audit and govern privileged accounts.
- Prove compliance more easily with prebuilt reports and complete system transparency.