
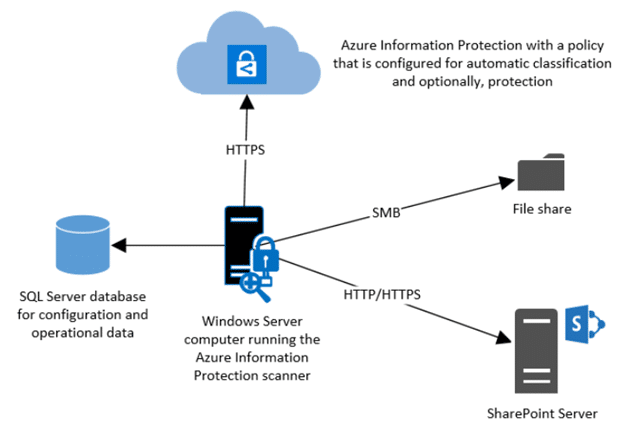
Azure Information Protection (AIP) is Microsoft’s solution to classify, label, and protect sensitive documents. The AIP scanner runs as a Windows service and can be used to protect on-premise documents within the following data stores:
- Local Folders where the scanner service is configured
- Network shares that use the SMB protocol
- Document Libraries and Folders for SharePoint 2013-SharePoint 2019
By default, the AIP scanner client uses Windows IFilters to identify sensitive content within documents and supports the following file types:
| Application type | File type |
| Word | .doc; docx; .docm; .dot; .dotm; .dotx |
| Excel | .xls; .xlt; .xlsx; .xltx; .xltm; .xlsm; .xlsb |
| PowerPoint | .ppt; .pps; .pot; .pptx; .ppsx; .pptm; .ppsm; .potx; .potm |
| Text | .txt; .xml; .csv |
Additional configuration can be done following this Microsoft documentation to support additional file types.
The scanner can be used in two basic modes:
- Discovery Mode Only – Scans can be run against configured repositories to generate reports that discover files that contain sensitive information types and will indicate what labels could be applied to these files
- Run the scanner to automatically apply the labels – This mode will discover files that contain sensitive information types and automatically apply the labels based on the classifications
The scanner uses the information types that are available in the Office 365 Security & Compliance Center. This includes over 80 out of the box criteria which use a combination of regular expressions and keywords, in conjunction with character proximity, checksums, and confidence levels configured where applicable. Refer to our earlier blog post on how to configure your own custom information types.
How to Configure the Azure Information Protection Scanner
The AIP Scanner can be configured by following a few simple steps. First, you will need the following prerequisites
- An Azure subscription that includes Azure Information Protection Plan 1 or Plan 2
- One the following Azure Information Protection clients installed on your windows server
- A SQL Server which is accessible from the windows server where the scanner client is installed
Before installing the AIP Scanner client, you will need to configure a profile within Azure.
1. Sign in to the Azure Portal, and navigate to the Azure Information Protection pane
2. Under the Scanner heading, select Profiles and then select Add to add a new profile

3. Select Add to add a new profile. The “Add a new profile”. The following configurations will need to be set
| Setting | Details |
| Profile Name | A name to be used to identify the profile’s configuration settings and data repositories |
| Description | A description to be used for administrative purposes to help identify the scanner’s profile name |
| Schedule | Specifies how often the scanner runs on the specified data repositories. This can be set to Manual for a single scan that is started manually, or to Always where the specified data repositories are repeatedly scanned in sequence |
| Info types to be discovered | Specifies what patterns are detected by the scanner. When the Policy only option is specified, the scanner uses the conditions (predefined information types and custom) that you have specified for labels. When the All option is specified, the scanner uses any custom conditions that you have specified for labels and all information types that are available to specify for labels, regardless of whether labels are configured for any conditions. |
| Configure Repositories | The desired Local paths, UNC paths, or SharePoint paths that will be scanned. These can be added one at a time, or imported using a CSV file. |
| Enforce | Specifies whether the scanner only logs the files that meet the conditions you’ve specified without applying the corresponding label (the installation default setting), or applies the label. When the enforce option is set to Off, the scanner scans the data repositories in the “what if” mode, to log results only, without setting the classification or protection that the corresponding label would apply. When this option is set to On, the scanner scans the data repositories, and for files that meet the conditions, apply the corresponding label to set the classification and optionally, protection. |
| Label Files based on Content | Select Off to apply a default label to all files in the data repository, without inspecting the files for any conditions defined for your labels. If you have set a default label for this data repository, that label will be applied. If no default label is configured for the data repository, the default label configured in the Azure Information Protection policy is used. Select On to inspect the files for the conditions defined for your labels. |
| Default Label | Specifies whether the scanner sets a default label on unlabeled files for this data repository. You can apply the default label from the Azure Information Protection policy, or another label: – None: For unlabeled files, do not apply a default label. – Policy default: For unlabeled files, apply the default label that is specified in the Azure Information Protection policy. – Custom: For unlabeled files, apply the specified label. |
| Relabel Files | Specify whether to apply a different label to a file that’s already labeled. By default, the scanner doesn’t relabel the files, unless the new label has higher sensitivity than the current label, and the initial label was not manually applied by an end-user. When you select On, the scanner always replaces an existing label when the configured conditions apply. |
| Preserve “Date Modified”, “Last Modified” and “Modified By” | Specify whether to leave the date unchanged for documents that the scanner labels |
| File Types to Scan | Specifies the file types to be included or excluded from scanning. To scan all files except specific file types, select Exclude and type the list of file name extensions to exclude from scanning. To scan specific file types, select Include and type the list of file name extensions to be scanned. |
| Default Owner | Specifies the email address for the Owner custom property when a file is classified, and for the Rights Management owner if the file is not already protected. |
For the sake of this blog post, my AIP profile was configured as follows:
- Schedule: Manual
- Info Types to be Discovered: All
- Enforce: Off
- Label files based on content: On
- Default label: Policy Default
- Relabel files: Off
- Preserve “Date Modified”, “Last modified”, and “Modified by”: On
- File types to scan: Exclude .lnk,.exe,.com,.cmd,.bat,.dll,.ini,.pst,.sca,.drm,.sys,.cpl,.inf,.drv,.dat,.tmp,.msp,.msi,.pdb,.jar,.ocx,.rtf,.rar,.msg
- Default Owner: Scanner Account
Once your profile is configured, you will notice that it shows “Nodes” set to 0. This will be set to 1 once you have fully installed the AIP Scanner client. In order to do so, you will require
- A service principal account to be used to connect to the Azure Rights Management service non-interactively to protect or unprotect files. This is done using the Set_RMSServerAuthentication cmdlet.
- Two applications registered in Azure
Active Directory which will be used for the Set-AIPAuthentication cmdlet
- A Web App/API application
- A Native Application
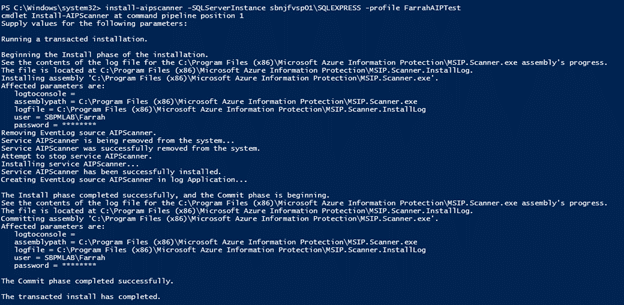
A detailed set of steps to complete this configuration is available in this Microsoft doc. Once the service account and application registrations have been successfully created, you can run the Install-AIPScanner command in PowerShell where you will need to specify the SQL Server instance and the name of the profile created in the Azure portal. This will need to be done on every windows server hosting a client repository, meaning this will need to be done on any SharePoint server or Windows server that you are interested in collecting data from. An exception to this is when your target repositories are UNC paths, and all UNC paths are accessible from a single Windows server using the same local service account.
Now that the AIP Scanner has been installed, you will see a Node in the AIP profile you previously configured, and you are ready to run your first scan.

Run a Scan with the Azure Information Protection Scanner
Once the scanner has been configured, the process to run a scan is pretty straight forward. In the Azure Information Protection – Profiles pane of the Azure portal, simply select your profile name and then click the Scan Now option.

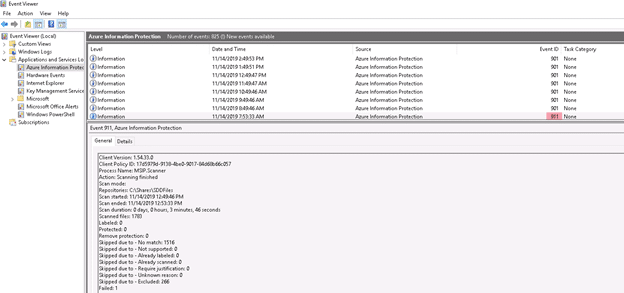
The status of the scan will be populated in the Last Scan Results and Last Scan (End Time) columns. You can also view the scan status in the Azure Information Protection log in Windows Event viewer on the Windows Server where the AIP Scanner client is installed. You will see an Event ID 911 when the scan has completed.
Review Results
Once the scan has completed, you can review the results on the client server under %localappdata%MicrosoftMSIPScannerReports. There will be two separate files
- A text file that shows a summary of the scan
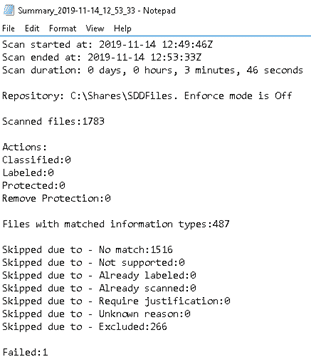
- A CSV formatted file with the details of the findings.

The detailed report will return a row for each file with matched information types. The first few columns show the repository and file scanned along with the scan status for the specific file. For the use case of discovering sensitive data, the focus should be on the Information Type Name column which displays the types of sensitive data that was identified within the file.
Centralized reporting for the AIP scanner, which is currently in preview, leverages Azure Monitor to aggregate data from all clients and scanners and stores the data in Log Analytics workspace.
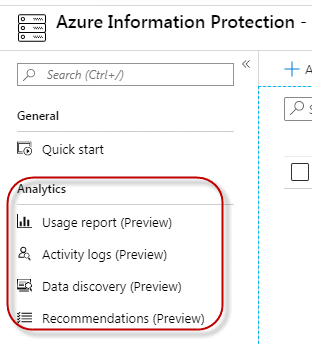
The following reports are available out of the box, but administrators also have the ability to customize reports and create their own reports and Power BI dashboards:
- Usage Report – Displays high-level information about which labels are being applied, to how many documents and emails, how many users and devices are doing the labeling and with what applications.
- Activity Logs – Displays details of what labeling actions were performed by specific users and applications, from specific devices, and for specific file paths. In addition, it provides information on which users are accessing labeled or protected documents.
- Data Discovery – Displays file-level details pertaining to applied labels and protections, along with identified sensitive data.
- Recommendations – Provides recommended actions to take related to repositories that contain sensitive data or unprotected files that contain sensitive data.
To learn more about the analytics provided for the AIP scanner, refer to this Microsoft document.
Closing Thoughts
Azure Information Protection is part of a family of complementary solutions to discover, classify, and ultimately protect sensitive information. It not only provides visibility into the potentially sensitive data that exists within your files but provides additional functionality to protect them as well such as labeling or the application of policies to control specific actions.
While AIP provides an integral component to a DAG strategy, it can be enriched through the use of a full-fledged DAG solution such as StealthAUDIT which can provide additional context and controls including
- Details including who is accessing files that are protected by AIP and what they are doing with it
- Context into user permissions and effective access
- Visibility into additional file types including image files
Learn more about STEALTHbit’s Data Access Governance Solutions here.

Farrah Gamboa is a Director of Technical Product Management at Stealthbits – now part of Netwrix. She is responsible for building and delivering on the roadmap of Stealthbits products and solutions.
Since joining Stealthbits in 2012, Farrah has held multiple technical roles, including Scrum Master and Quality Assurance Manager. Farrah holds a Bachelor of Science degree in Industrial Engineering from Rutgers University
Related Posts
- Sensitive Data Discovery for Compliance
- Advanced Data Security Features for Azure SQL- Part 1: Data Discovery & Classification
- How to Protect Office 365 by Classifying Your Data with Microsoft’s AIP Labels
- 2019 Verizon DBIR Key Findings
- 5 Cybersecurity Trends for 2019
- EU GDPR: Paving the Way for New Privacy Laws?
- Announcing Stealthbits Activity Monitor 3.0 & StealthINTERCEPT 5.1
- Key Take Aways from the Ponemon 2018 Cost of Insider Threats Report
- Where Real Organizations Are with EU GDPR 10 Days from Launch
- Stealthbits Cyber Kill Chain Attack Catalog: Active Directory Attacks and More
Thank you for the post.
I was able to see the label being applied to the documents but not the content markings.
Unless I change the label, the header/footer dont seem to appear
Am I missing any additional settings to make the label properties to be applied.